Restarting LXDE when it freezes/hangs

This is going to be of interest to no-one except me, but here it is:

  • Hit CTRL-ALT-F2 to switch to console mode (CTRL-ALT-F1 will bring you back to LXDE)
  • Kill the /usr/bin/X process
  • That’s it !

Understanding file associations in LXDE and PCManFM

Or “understanding how PCManFM decides which program to launch when you double-click on a file”

Or “understanding the list of suggested programs when you right-click on a file in PCManFM”

Or “making sense of the mimeinfo.cache, defaults.list and mimeapps.list crazyness”

The problem

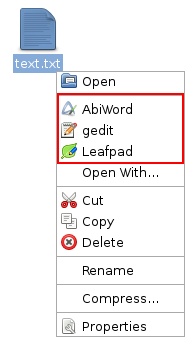
Create a text file (text.txt) file in PCManFM and right click on it: PCManFM displays a list of possible application that can open the file:

Now if I double-click on the text.txt file, abiword (the first item highlighted in the screenshot above) is going to be launched.

  • Where does this “AbiWord – gedit- Leafpad” list come from ?
  • I want to use gedit instead of AbiWord when double-clicking on the file: how can I change this ?
  • I want my text file to be opened by a program that is not listed: how can I do this ?
  • Where in the world is Carmen SanDiego ?

Sit back and relax, I’m going to tell you the whole story.

At the beginning, there was the .desktop files

These files are mainly used to specify which elements are going to be displayed in the LXDE start menu and on your desktop. Check my creating LXDE shortcuts post for more information.

Then there was mimeinfo.cache

This file is located in /usr/share/applications/mimeinfo.cache and it is a basically a raw reverse cache for the .desktop information. Check this link for more information.

More precisely, each .desktop file on your system (which can be located either in /usr/share/applications, in /usr/local/share/applications or in ~/.local/share/applications) can contain a “MimeType” attribute which states the mimetype that the program associated to the .desktop file can handle.

On my Fedora installation, I have 3 text editors: Abiword, Leafpad and gedit and each one of them can open files that have a text/plain mimetype:


[laurent@localhost applications]$ cat fedora-abiword.desktop | grep text/plain
MimeType=application/x-abiword;text/x-abiword;text/x-xml-abiword;text/plain;

[laurent@localhost applications]$ cat gedit.desktop | grep text/plain
MimeType=text/plain;

[laurent@localhost applications]$ cat fedora-leafpad.desktop | grep text/plain
MimeType=text/plain;

Now if I have a look in mimeinfo.cache, I can find the reverse mapping that we just talked about:

[laurent@localhost applications]$ cat mimeinfo.cache | grep text/plain
text/plain=fedora-abiword.desktop;gedit.desktop;fedora-leafpad.desktop;

So this translates to “any file with a text/plain mimetype can be opened using either abiword, gedit or leafpad”.

Astute readers will notice that:

  • This list (abiword + gedit + leafpad) is exactly the one displayed in PCManFM when I right click on a file (see screenshot above).
  • The first item in this list (in my case: abiword) is the program that is launched when I double-click on a text file in PCManFM.

However, editing this mimecache.info file (to change the order of the .desktop files that are associated with the text/plain mimetype) is not what you want to do. The truth is you may lose all your changes after installing/removing a new Linux package.

This is because this file is generated by launching the “update-desktop-database” utility. This tool parses all your .desktop files and generates the mimeinfo.cache file… more or less each time you install a new package. This is where the defaults.list files join the party

Here comes defaults.list

defaults.list is a file where you configure the default program that should be used to open a file. To be very specific, this is where you configure the default “mime type -> .desktop file” association.

Like .desktop files, you can have a defaults.list file in any of the following locations (you can even have 3 files: one at each location).

  • /usr/share/applications
  • /usr/local/share/applications
  • ~/.local/share/applications

First, there is a global defaults.list file located in /usr/share/applications and then you can have one for each user, located in ~/.local/share/applications. As you can guess, the “user-level” file has higher priority than the “global one”.

If I only have a /usr/share/applications/defaults.list file that contains a “text/plain -> gedit.desktop” mapping, then double-clicking on a text file in PCManFM will open gedit, no matter what the ordering of mimeinfo.cache is:

[laurent@localhost applications]$ cat /usr/share/applications/defaults.list | grep text/plain
text/plain=gedit.desktop

But if I also have a ~/.local/share/applications/default.list file that contains a “text/plain -> fedora-leafpad.desktop” mapping, then double-clicking on a text file in PCManFM will open leafpad (since this file has “higher priority” than the files in the 2 other locations).

[laurent@localhost applications]$ cat ~/.local/share/applications/defaults.list | grep text/plain
text/plain=fedora-leafpad.desktop

But wait, there is more !

The mimeinfo.cache, the defaults.list and the mimeapps.list

Yes that’s true, one more file to bother you (did I mention “crazyness” at the beginning of this post ?).

Now if you think that ~/.local/share/applications/defaults.list has higher priority than /usr/share/applications/defaults.list which has higher priority than /usr/share/applications/mimeinfo.cache”, you would still be incorrect because ~/.local/share/applications/mimeapps.list has even higher priority than all these bastards.

mimeapps.list allows you to:

  • add even more “right-click” options to PCManFM right click menu
  • set the default program for a mimetype (exactly like in defaults.list)

Although I’m not aware of any tool to help you deal with defaults.list file, there are at least 2 options to help you with mimeapps.list

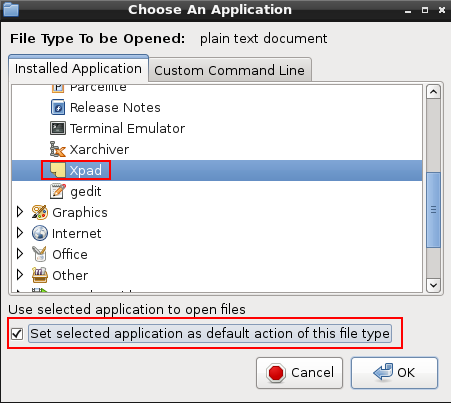
OK, so let’s say that you would like to open your text file with yet another program that is not listed in the PCManFM right-click menu. Just choose the “Open with…” option and select an application. In my case, I’ll choose “Xpad”, and I’ll choose the “set selected application as default” option:

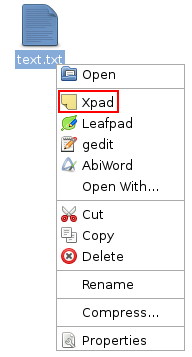
And there you are, xpad is now part of your right-click menu:

Behind the scene, PCManFM created a mimeapps.list file:


laurent@localhost applications]$ cat ~/.local/share/applications/mimeapps.list

[Added Associations]
text/plain=fedora-xpad.desktop;

[Default Applications]

text/plain=fedora-xpad.desktop

Another way to generate this file is to use the xdg-mime tool with “xdg-mime default fedora-xpad.desktop text/plain”

So let’s recap

The list of program that is displayed when right-clicking on a file in PCManFM is the combination of:

  • mimeinfo.cache
  • mimeapps.list

The default program that is launched when you double-click on a file in PCManFM is (first match wins):

  • The one from ~/.local/share/applications/mimeapps.list
  • The one from ~/.local/share/applications/defaults.list
  • The one from /usr/local/share/applications/defaults.list
  • The one from /usr/share/applications/defaults.list
  • The first one from /usr/share/applications/mimeinfo.cache

Laurent KUBASKI

SSH local/dynamic/reverse port forwarding for dummies

Or “how to connect to a server that is protected by a firewall that blocks all incoming (inbound) connections”.

To implement this, I’m using a Windows laptop running two virtualized CentOS instances using VMWare player:

  • The first CentOS instance (“centos1.entropysoft.net”) is going to connect to a web server running on…
  • The second CentOS instance (“centos2.entropysoft.net”).
  • On centos2:
  • I will be logged on centos1 using user “laurent1” and on centos2 using user “laurent2”.

Registering the CentOS server names in the DHCP/DNS

Not really related to this post, but I always forget how to do it: I had to modify the /etc/sysconfig/network-scripts/ifcfg-eth0 file so that the DHCP correctly registers the server name in the DNS:


[laurent@centos1 network-scripts]$ cat ifcfg-eth0
HWADDR=00:0C:29:C6:C7:30
TYPE=Ethernet
BOOTPROTO=dhcp
DEFROUTE=yes
PEERDNS=yes
PEERROUTES=yes
IPV4_FAILURE_FATAL=yes
IPV6INIT=no
NAME=eth0
UUID=7a3a6545-5f7e-4668-afd6-f511714aba67
ONBOOT=yes
DHCP_HOSTNAME=centos1

For more information, check this post.

Configuring the firewall on centos2

For these series of tests, the firewall on centos2 will need to block/unblock inbound/outbound connections on port 22 (SSH), 80 (HTTP) & 443 (HTTPS) so I will use this simple iptables script:

#!/bin/bash
# Reset
iptables -F

# Changing OUTBOUND policies to DROP (instead of ACCEPT)
iptables -P INPUT DROP
iptables -P OUTPUT DROP

# Allow loopback
iptables -A INPUT -i lo -j ACCEPT
iptables -A OUTPUT -o lo -j ACCEPT

# Allow icmp
iptables -A INPUT -p icmp -j ACCEPT
iptables -A OUTPUT -p icmp -j ACCEPT

# allow INBOUND SSH
iptables -A INPUT -i eth0 -p tcp --dport 22 -m state --state NEW,ESTABLISHED -j ACCEPT
iptables -A OUTPUT -o eth0 -p tcp --sport 22 -m state --state ESTABLISHED -j ACCEPT

# allow INBOUND HTTP
iptables -A INPUT -i eth0 -p tcp --dport 80 -m state --state NEW,ESTABLISHED -j ACCEPT
iptables -A OUTPUT -o eth0 -p tcp --sport 80 -m state --state ESTABLISHED -j ACCEPT

# allow INBOUND HTTPS
iptables -A INPUT -i eth0 -p tcp --dport 443 -m state --state NEW,ESTABLISHED -j ACCEPT
iptables -A OUTPUT -o eth0 -p tcp --sport 443 -m state --state ESTABLISHED -j ACCEPT

# allow OUTBOUND SSH
iptables -A OUTPUT -o eth0 -p tcp --dport 22 -m state --state NEW,ESTABLISHED -j ACCEPT
iptables -A INPUT -i eth0 -p tcp --sport 22 -m state --state ESTABLISHED -j ACCEPT

# allow OUTBOUND HTTP
iptables -A OUTPUT -o eth0 -p tcp --dport 80 -m state --state NEW,ESTABLISHED -j ACCEPT
iptables -A INPUT -i eth0 -p tcp --sport 80 -m state --state ESTABLISHED -j ACCEPT

# allow OUTBOUND HTTPS
iptables -A OUTPUT -o eth0 -p tcp --dport 443 -m state --state NEW,ESTABLISHED -j ACCEPT
iptables -A INPUT -i eth0 -p tcp --sport 443 -m state --state ESTABLISHED -j ACCEPT

# allow DNS (otherwise www.XXX.com will never be resolved)
iptables -A OUTPUT -p udp -o eth0 --dport 53 -j ACCEPT
iptables -A INPUT -p udp -i eth0 --sport 53 -j ACCEPT

By commenting/uncommenting the needed lines and running the script, you can easily block/unblock the needed protocols (well, not exactly, since we would need an application layer firewall for this, but that’s another story). Note that these firewall rules will be lost after rebooting the centos2 server, which is what we want when testing !

Configuring the web server on centos2

As I said, there is a web server running at http://centos2.entropysoft.net:80. I’m simply using Apache that is listening on port 80 and serving this simple HTML page:

[laurent2@centos2 html]$ cat /var/www/html/index.html
<html>
<body>
Hello from centos2
</body>
</html>

Alternatively, you can use the python SimpleHTTPServer module:


[laurent2@centos2 Documents]$ pwd
/home/laurent2/Documents
[laurent2@centos2 Documents]$ cat index.html
<html>
<body>
Hello from centos2
</body>
</html>
[laurent2@centos2 Documents]$ sudo python -m SimpleHTTPServer 80
Serving HTTP on 0.0.0.0 port 80 ...

Exercice #1: no port forwarding

In this exercise, the centos2 firewall allows incoming HTTP connections.

To test this, simply run the iptables script above and then… well that’s it: open your web browser on centos1 and connect to http://centos2.entropysoft.net:80. Or using curl:

[laurent1@centos1 ~]$ curl http://centos2.entropysoft.net:80
<html>
<body>
Hello from centos2
</body>
</html>

Exercice #2: SSH local port forwarding

In this exercise, the centos2 firewall blocks inbound HTTP, but allows inbound SSH.

To test this, simply disable the “allow INBOUND HTTP” rule and run the iptables script: this should prevent the curl command used above from working (since the firewall now prevents centos1 to connect to centos2 on port 80).

To connect to our webserver, we are going to use the “local port forwarding” capacities of the SSH tool, which will allow us to:

  • use the SSH channel between the two servers to “tunnel” the HTTP traffic
  • encrypt the traffic

First, on centos2, let’s make sure that the sshd daemon is running:

[laurent2@centos2 bin]$ sudo service sshd status
openssh-daemon (pid 2095) is running...

The ssh daemon listens on port centos2:22 by default and we can connect to it from centos1:

[laurent1@centos1 ~]$ sudo ssh -L 9999:centos2.entropysoft.net:80 laurent2@centos2.entropysoft.net
laurent2@centos2.entropysoft.net's password:
Last login: Mon Oct 22 16:32:51 2012 from centos1.entropysoft.net
[laurent2@centos2 ~]$

We are now connected to centos2 (from centos1) and we can execute remote commands using the SSH shell: nothing fancy here.

The nice part is the “-L” command line that basically says “hey you SSH: can you please listen to all requests that arrive at centos1:9999 and forward them to centos2:80 ?”.

You can use the netstat command to check that you indeed have port centos1:9999 listening for incoming connections:

[laurent1@centos1 ~]$ sudo netstat -apn | grep 9999
tcp 0 0 127.0.0.1:9999 0.0.0.0:* LISTEN 6266/ssh
tcp 0 0 ::1:9999 :::* LISTEN 6266/ssh

And since your webserver is listening on port centos2:80, you can now access it from centos1 by connecting to http://localhost:9999 (yes, it works, even if there is not webserver on centos1: SSH silently redirects you to centos2 behind the hood !)

[laurent1@centos1 ~]$ curl http://localhost:9999
<html>
<body>
Hello from centos2
</body>
</html>

Of course, the “local port” (9999) and the “remote port” (80) do not need to be different. For example, you could use “-L 80:centos2.entropysoft.net:80” and it would work exactly the same.

Note that if you try “curl http://centos1.entropysoft.net:9999&#8221; instead of “curl http://localhost:9999&#8221;, it will not work since the netstat command above shows that centos1 only allows connections coming from locahost. To use “centos1.entropysoft.net:9999” you need to launch SSH with “-L centos1.entropysoft.net:9999:centos2.entropysoft.net:80″.

Exercice #3: SSH dynamic port forwarding

In this exercise, the centos2 firewall blocks inbound HTTP, but allows inbound SSH (exactly like in the previous exercise).

The “issue” with the previous exercise is that you have to explicitely say that you want to redirect port centos1:9999 to port centos2:80 (that’s the “-L” option remember ?). But what if you want to say “each local connection to port centos1:XX needs to be redirected to the same port on centos2” ?

Well, you can, thanks to the SSH -D option.

To use it, first close the SSH connection from the previous exercise and open a new one (you are still on centos1) like this:

[laurent1@centos1 ~]$ ssh -D 9999 laurent2@centos2.entropysoft.net
laurent2@centos2.entropysoft.net's password:
Last login: Mon Oct 22 16:57:25 2012 from centos1.entropysoft.net
[laurent2@centos2 ~]$

You know have a SOCKS proxy running on centos1 (and listening on port 9999). From there, let’s use curl again to connect to our webserver:

[laurent1@centos1 ~]$ curl --socks5 localhost:9999 http://localhost:80

<html>
<body>
Hello from centos2
</body>
</html>

If you do not want to use curl and prefer to use Firefox, go to the “Edit > Preferences > Network > Settings” window to set the SOCKS proxy:

So what’s the difference with the previous example you may ask ? Well, with the SOCKS proxy approach, your centos2 webserver can be running on any port (80, 8080, 8081 etc…) it doesn’t matter: you can access it from centos1 without having to know the port in advance when creating the SSH connection !

Exercice #4: SSH reverse local port forwarding

In this exercise, the centos2 firewall blocks ALL inbound connections, but allows outbound SSH connections.

OK, so now the firewall doesn’t allow any connection to be established from centos1 to centos2  (run the iptables script after commenting out all INBOUND rules), so how can we access the webserver ? Well, we need to use the “hollywood principle”: “don’t call me, I’ll call you”.

Said differently, centos2 is going to open a connection to centos1 and centos1 will use this open channel to communicate with centos2 (sneaky huh ?).

So, since centos2 is going to connect to centos1, we need to first make sure that the ssh daemon is running on centos1.

[laurent1@centos1 ~]$ sudo service sshd status
openssh-daemon (pid 2077) is running...

Then, switch to centos2 and enter this command (make sure that the SSH session from the previous exercice is stopped on centos1)

[laurent2@centos2 bin]$ sudo ssh -R 9999:localhost:80 laurent1@centos1.entropysoft.net
laurent1@centos1.entropysoft.net's password:
Last login: Mon Oct 22 17:43:02 2012 from centos2.entropysoft.net
[laurent1@centos1 ~]$

This time, we don’t use the “-L” option, but the “-R” option. This means “listen for connections on centos1:9999 and forward them to localhost:80 (localhost being centos2)”. Note that this does exactly the same thing that in the second exercise, except that here we are entering this command from centos2.

Now if you go back to centos1 and use the netstat command, you’ll see that the ssh(ssh daemon) process is listening for connections on port centos1:9999.

[laurent1@centos1 bin]$ sudo netstat -apn | grep 9999
tcp 0 0 127.0.0.1:9999 0.0.0.0:* LISTEN 6890/sshd
tcp 0 0 ::1:9999 :::* LISTEN 6890/sshd

You can now access the webserver from centos1:

[laurent1@centos1 ~]$ curl http://localhost:9999

<html>
<body>
Hello from centos2
</body>
</html>

The curl command line is exactly the same as the one we used in the second exercise, the only difference is that the SSH tunnel was launched from centos2, allowing the firewall to be traversed.

Exercice #5: SSH reverse dynamic port forwarding

In this exercise, the centos2 firewall blocks ALL inbound connections, but allows outbound SSH connections  (exactly like in the previous exercise).

We are going to do what we did in the “dynamic port forwarding” exercice, but this time by initiating the SSH tunnel from centos2. Also – and that’s the tricky part – the SOCKS proxy will be created on centos2, which means that we need to run two SSH commands from centos2.

First, the one to create the SOCKS proxy (yes: we are on centos2 and we use the SSH command to connect to centos2)

[laurent2@centos2 ~]$ sudo ssh -D centos2.entropysoft.net:9999 laurent2@centos2.entropysoft.net
laurent2@centos2.entropysoft.net's password:
Last login: Wed Oct 24 13:37:54 2012 from centos2.entropysoft.net
[laurent2@centos2 ~]$

Then, the second one to create the SSH tunnel (we are still on centos2):

[laurent2@centos2 ~]$ sudo ssh -R 9998:centos2.entropysoft.net:9999 laurent1@centos1.entropysoft.net
laurent1@centos1.entropysoft.net's password:
Last login: Wed Oct 24 13:38:53 2012 from centos2.entropysoft.net
[laurent1@centos1 ~]$

So in the end, this is what we have:

  • on centos1, we have the ssh daemon process listening on port 9998 (thanks to the “-R” command launched from centos2).
  • when connecting to this port on centos1, we will be redirected to port centos2:9999.
  • and we will be connected to the SOCKS proxy, which is listening for incoming connections on the centos2:9999.

So now we can go to centos1 and execute the exact same curl command that in the “dynamic port forwarding exercise”:

[laurent1@centos1 ~]$ curl --socks5 localhost:9998 http://localhost:80

<html>
<body>
Hello from centos2
</body>
</html>

Laurent KUBASKI
Email signatures from hell

When I was a developer, I used to mainly exchange emails with fellow developers and my email signature was usually “Laurent”. Short, concise, simple: in fact, I used to actually type it by hand instead of telling my mail client to automatically generate it for me (crazy huh ?).

And then, I started working with managers, marketers & consultants and these guys – especially consultants – heavily use the “automatic e-mail signature appending” feature of their email client. Have you already received e-mails where the signature was even longer that the mail itself ? Welcome to my world !

I’ve gathered some of these emails: the sender name/company name/telephone numbers have been changed to protect the guilty, but apart from that, these signatures are 100% legit.

First the short one: name – title – company – address – telephone – web site. That’s a total of 6 lines: rating = 9/10.

Then, you have people that really, really, really want to make sure that you can reach them. In this example, we have a total of 12 lines: rating = 5/10.

Some people solve this “multiple numbers” issue by having multiple numbers on the same line. Here we have a total of 5 lines: rating = 8/10.


Now if you think that it’s almost impossible to reach 5/10, just include a footer that no one will read and you have a winner ! In this example, the company address is not mentioned and the office + mobile numbers are grouped on a single line: a good start !

Alas, the 6 lines footer results in a 12 lines email signature. Rating = 5/10.

To go below the 5/10 rating, you have to be creative. Like this one where the footer is 7 lines long (that’s longer that the full signature used as my first example), and where the author happily adds a link to the product he’s in charge of. This gives us a total of  15 lines for a rating of 3/10.

And now ladies and gentlemen, the clear winner with its unique combo of name – title – company name – address – office/fax number – website – upcoming company events and 10 lines footer for a total of 25 lines and a rating of 1/10.

Laurent KUBASKI

Solving the “Permission denied: make_sock: could not bind to address” issue when starting Apache on Linux

Does this looks familiar ?

[laurent2@centos2 conf]$ sudo service httpd start
Starting httpd: (13)Permission denied: make_sock: could not bind to address [::]:8082
(13)Permission denied: make_sock: could not bind to address 0.0.0.0:8082
no listening sockets available, shutting down
Unable to open logs
 [FAILED]

No, it’s not because I’m not running this as root (as explained here, here and there) : you can see in the command above that I’ve used the sudo command !

It’s (again) because SELinux is preventing the httpd process to listen on port 8082.

This can be checked by having a look at the SELinux log files:

  • if the auditd daemon is running, SELinux denials are in /var/log/audit/audit.log.
  • if the daemon is not running, you’ll find them in /var/log/messages.
[laurent2@centos2 conf]$ sudo tail /var/log/audit/audit.log
[SNIP]
type=AVC msg=audit(1350478371.269:183): avc: denied { name_bind } for pid=3207 comm="httpd" src=8082 scontext=unconfined_u:system_r:httpd_t:s0 tcontext=system_u:object_r:port_t:s0 tclass=tcp_socket
[SNIP]

To make sure that SELinux is indeed the culprit, you can simply temporarly disable it to see if that solves your issue:

[laurent2@centos2 conf]$ getenforce
Enforcing
[laurent2@centos2 conf]$ sudo setenforce 0
[sudo] password for laurent2:
[laurent2@centos2 conf]$ getenforce
Permissive
[laurent2@centos2 conf]$ sudo service httpd start
Starting httpd: [ OK ]

Now the reason why SELinux prevents httpd to start listening on port 8082 is because only a certain number of ports are allowed:

[laurent2@centos2 conf]$ sudo semanage port -l | grep http
 http_cache_port_t tcp 3128, 8080, 8118, 8123, 10001-10010
 http_cache_port_t udp 3130
 http_port_t tcp 80, 443, 488, 8008, 8009, 8443
 pegasus_http_port_t tcp 5988
 pegasus_https_port_t tcp 5989

(by the way: if semanage is not installed, check here)

From there, you can choose to either disable SELinux, use a port that is currently allowed, or add the port you want to use to the list of authorized ports.

Connecting to a Windows Shared Drive from CentOS using smbclient

What is the quickest way to access a Windows Shared Drive from CentOS ? Use smbclient !

It’s an FTP-like client to access SMB/CIFS resources on a server and its part of the “samba-client” package which is installed by default on CentOS.

[laurent@localhost Downloads]$ rpm -qf /usr/bin/smbclient
samba-client-3.5.10-114.el6.i686

The firewall is pre-configured so you don’t need to change anything to use it:

If you look on the internet, you’ll find lots of posts telling you to use this syntax: smbclient [SHARED_DRIVE_UNC_PATH] -U [username]. But if your target Windows server belongs to a domain, you’ll get an NT_STATUS_LOGON_FAILURE error:

[laurent@localhost Downloads]$ smbclient //10.6.9.206/tmp -U laurent
Enter laurent's password:
session request to 10.6.9.206 failed (Called name not present)
session setup failed: NT_STATUS_LOGON_FAILURE

That’s because the domain name must be provided using the -W option. Also (and I must say that I lost a couple of minutes before of this), the password that you must enter is the one from the domain you want to connect to, not the one from your local Linux account.

[laurent@localhost Downloads]$ smbclient //10.6.9.206/tmp -U laurent -W entropysoft
Enter laurent's password:
Domain=[ENTROPYSOFT] OS=[Windows 7 Professional 7601 Service Pack 1] Server=[Windows 7 Professional 6.1]
 smb: \>

From there, you can navigate in the target system using the “ls” & “cd” commands and upload/download files using the “put” & “get” commands: see the smbclient man pages for more information.

smb: \> ls
 . DR 0 Fri Oct 5 09:27:04 2012
 .. DR 0 Fri Oct 5 09:27:04 2012
 activity_lifecycle.png A 82637 Mon Sep 3 14:01:54 2012
 AllowImperso.ps1 A 387 Mon Dec 12 16:03:37 2011
 amazon.pem 1696 Thu Aug 30 13:17:43 2012
 amazon.ppk A 1464 Wed Sep 12 19:41:54 2012

37897 blocks of size 8388608. 17669 blocks available
smb: \> get activity_lifecycle.png
getting file \activity_lifecycle.png of size 82637 as activity_lifecycle.png (2017.5 KiloBytes/sec) (average 2017.5 KiloBytes/sec)
smb: \>

Laurent KUBASKI